As today is “Threading the Needle Day”, it only seemed appropriate that I should post a DIY.
I thought about a beaded collar, but let’s face it…everyone has done one so what would I be adding? I had a shirt and I had the beads, I just needed to think about what I wanted to share with you.
 I love a beautiful beaded collar and had originally thought that would be what I did with this sleeveless denim shirt. A little blinging up would bring some life into an otherwise average shirt I purchased at Target last summer. The problem wasn’t just not having anything new to offer if I did a collar, but also that I
 dislike HATE, being like everyone else!
But I already had the bits and pieces and I needed to write something that was appropriate for “Threading the Needle Day”, so I debated back and forth between beading the pocket flaps and beading the placket. I thought the pocket flaps would look too much like I had been bedazzled. So placket it was.
What? You don’t know what a placket is? No, it’s not some kind of jacket gone mad, it’s the part of the shirt where the buttons are!
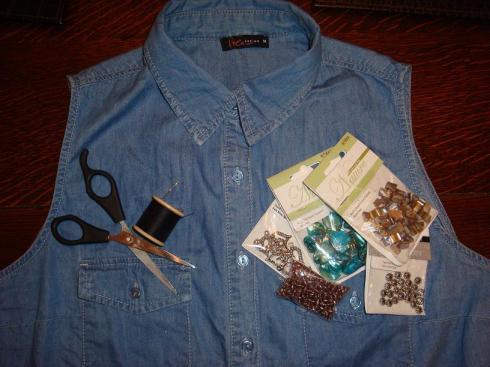
 I had a selection of shell beads, small glass beads and few silver jewelry rounds to work with. The only other items you’ll need are a needle and thread (how appropriate for Threading the Needle Day!), and scissors.
As I usually wear this shirt tucked in, I opted to only bead the part of the placket between the top three buttons, which would allow for tucking in without damaging any beading. Be sure to unbutton down to the spot you want to bead and only stich threw the top part of the placket – otherwise you will be stiching your shirt closed.
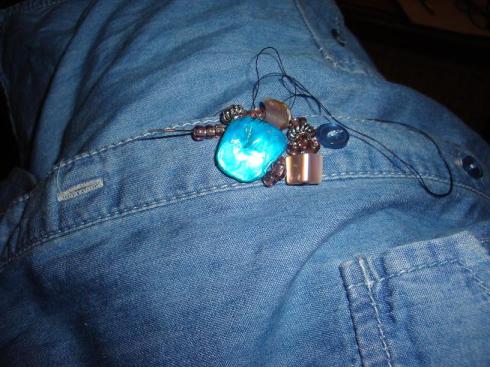
I simply started at the area above the lowest button and began stitching the beads on in a random manner. Whenever I used the small round glass beads I threaded three on the needle at a time so that sometimes I got a straight line of beads and sometimes I created little arches.
 I continued to work my way randomly up the placket, ensuring that I left a little room around the buttonhole so I could actually button it up if I choose.
 I made sure to work in smaller sections, tieing off every few centimetres (about 1 inch), just in case in the future one of the threads should break I won’t lose all the beads.
And that’s it! Simple and easy. All done while watching ANTM!
I’m really looking forward to wearing this revamped shirt this spring/summer. I won’t even have to try to figure out what necklace to wear with it because it now comes with its own bling.
What DIY creations are you making for “Threading the Needle Day”?
AND…
What do you think of beading the placket? (now that we all know what a placket is)
Related articles
- DIY – Beaded T-Shirt Necklace (astimegoesbuy.me)
- Beaded Bugs… (barbarabriggsdesigns.wordpress.com)
- The Beaded Lady – Pinterest Challenge (popcornonthestove.com)
- Embellished Collar Diy (cutoutandkeep.net)


July 25th, 2012 at 00:15
I LOVE it. You should bling the pocket flaps too. Although that may cause drag unless you’re doing the collar right up.
Portia xx
July 25th, 2012 at 01:09
Thanks Portia!
I thought about the pocket flaps but as I am a bustier girl I felt too self concious about doing the flaps.
Cheers,
Laura
July 25th, 2012 at 00:35
Super cute!
July 25th, 2012 at 01:09
Thanks June!
I am very happy with how it turned out. 🙂
Cheers,
Laura
July 25th, 2012 at 00:38
Wow! Great job! Nice little twist!
July 25th, 2012 at 01:10
Thanks Marie!
That’s me…a little twisted! 🙂
I like things just a little different.
Now I am looking forward to wearing this shirt for another summer.
Cheers,
Laura
July 25th, 2012 at 02:29
dear Laura,
Wow!!! what a difference that made!!!
I love it!
😉
Love, Lis
xoxooxox
July 25th, 2012 at 08:17
Thanks Lis!
It really did change a plain old shirt into something cool.
Now I have to resist the urge to bedazzle everything! 🙂
Cheers,
Laura
July 25th, 2012 at 06:14
Looks fab!
July 25th, 2012 at 08:18
Thanks!
I think it turned out pretty great.
It should get a good run this summer now that it has a little more style. 🙂
Cheers,
Laura
July 25th, 2012 at 13:10
You’re ridiculously talented, you know that? If I tried that I’d end up with a bloody jacket bedazzled mainly by the fingers I had inadvertently sewn onto it ;-P
July 25th, 2012 at 16:08
LOL!
I was a little worried I might end up with spots of blood but did pretty well with this effort!
It seems somewhere in the genetics there is a creative code that seems to make an appearance now and again. 🙂
Cheers,
Laura
August 31st, 2012 at 02:14
Reblogged this on Lockets and Pearls.
January 26th, 2013 at 00:10
[…] of you may remember this top from my DIY Threading the Needle Day. I realised that I hadn’t shared it in a photo shoot since I made it. Perfect chance to […]